English
  فارسی
فارسی  Türkçe
  Deutsch
  हिन्दी
  Español
  Italiano
  العربية
  Nederlands
  ไทย
ไทย  Shqip
Shqip  Azərbaycan
  Беларуская мова
  বাংলা
বাংলা  Bosanski
  български
  ဗမာစာ
ဗမာစာ  Basa Jawa
  Cebuano
  Dansk
Dansk  Հայերեն
  Suomi
Suomi  ქართული
  Hrvatski
  Svenska
  Íslenska
  日本語
日本語  Norsk Bokmål
  Қазақ тілі
  Кыргызча
  한국어
한국어  Gàidhlig
  ພາສາລາວ
  Polski
  Latviešu valoda
  Lietuviškai
  Magyar
  македонски јазик
  Bahasa Melayu
  Монгол хэл
  नेपाली
  Oʻzbek
  Português
  Română
  සිංහල
සිංහල  Српски језик
  Slovenčina
  Af-Soomaali
  Українська
  اردو
اردو  Tiếng Việt
  Afrikaans
  Русский
Table of contents [Show]
How to Create a Bootable USB Drive for Windows 10 and 11 Using Rufus: Step-by-Step Guide
Creating a bootable USB drive for Windows 10 and 11 is essential for installing or reinstalling your operating system. Rufus is a free and reliable tool that simplifies this process. This step-by-step guide will show you how to use Rufus to create a bootable USB drive for both Windows 10 and 11.
Why Use Rufus?
Rufus is popular for its speed, ease of use, and ability to create bootable USB drives efficiently. Key benefits include:
- Free and Open Source: Rufus is free to download and use.
- Fast Performance: Rufus is known for its quick formatting and USB drive creation.
- Versatility: Supports various file systems and boot options.
Requirements
Before you begin, ensure you have the following:
- A USB Drive: At least 8 GB of storage.
- Windows ISO File: Download the Windows 10 or Windows 11 ISO file from the official Microsoft website.
- Rufus Software: Download the latest version of Rufus from the official website.
Step-by-Step Guide to Creating a Bootable USB Drive with Rufus
Download and Install Rufus:
- Visit the Rufus website and download the latest version of the software.
- Run the executable file to launch Rufus; no installation is required.
Prepare Your USB Drive:
- Insert your USB drive into your computer.
- Ensure that all data on the USB drive is backed up, as the process will erase all existing data.
Open Rufus:
- Launch Rufus by double-clicking the downloaded executable file.
- Rufus will automatically detect your USB drive.
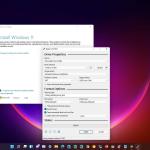
Select the ISO File:
- In the Rufus interface, click on the "SELECT" button next to "Boot selection."
- Browse and select the Windows 10 or 11 ISO file you downloaded.
Configure Rufus Settings:
- Partition Scheme: Choose 'GPT' for UEFI or 'MBR' for BIOS/UEFI.
- File System: Leave it as 'NTFS.'
- Volume Label: Rufus will automatically fill this in, but you can change it if desired.
Start the Process:
- Double-check all your settings.
- Click the "START" button to begin the process.
- A warning will pop up indicating that all data on the USB drive will be destroyed. Click "OK" to proceed.
Wait for Completion:
- Rufus will format the USB drive and copy the necessary files. This process might take a few minutes.
- Once finished, a "READY" message will appear.
Safely Remove the USB Drive:
- Close Rufus and safely eject the USB drive from your computer.
Tips for Optimal Performance
- Check System Compatibility: Ensure your PC meets the minimum system requirements for Windows 10 or 11.
- Backup Important Data: Always back up important files before starting the installation process.
- Use a High-Quality USB Drive: A reliable USB drive will prevent issues during the installation process.
Frequently Asked Questions
What is Rufus? Rufus is a free, open-source utility that helps format and create bootable USB flash drives.
Can I use Rufus for both Windows 10 and 11? Yes, Rufus supports creating bootable USB drives for both Windows 10 and 11.
Is Rufus safe to use? Yes, Rufus is safe and widely used for creating bootable USB drives.
Where can I download the Windows ISO file? You can download the Windows 10 or 11 ISO file from the official Microsoft website.
Creating a bootable USB drive with Rufus is a straightforward process that ensures you can install or reinstall Windows 10 or 11 efficiently. Follow these steps to get your operating system up and running quickly and smoothly!